26. Notifications and script debugging
The script can talk to the administrator while it is running. Notice,
sent to the application, the card appears directly in the editor - and this
the most practical debugging method available here.
==What is this
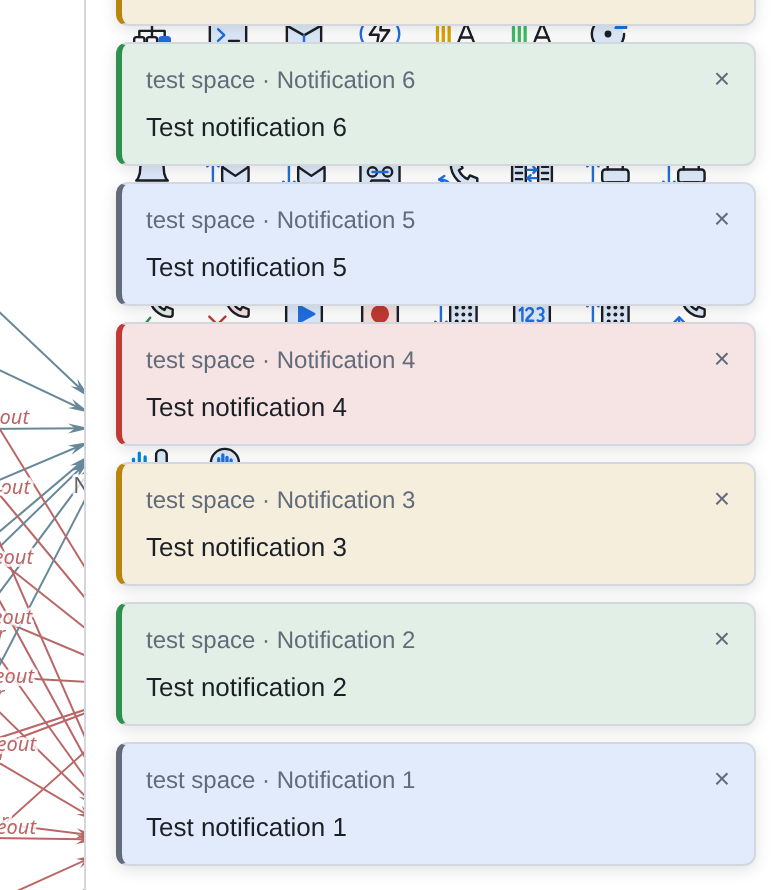
Cards appear in the lower right corner and grow upward. Each has:
-
in the header - script code and name of the component that sent it;
-
below - the text in its entirety, with long line breaks;
-
color of the bar on the left - type of notification: information, success, warning,
error;
-
cross on the right - close.
The stack has two sources, and the cards have the same appearance: messages from the editor himself
(the script is saved, the version on the server is newer, the files are not attached) and notifications from a running script.
How long does the card hang?
By default eight seconds, then disappears by itself. The deadline is set
in the sending component with the Auto-hide, c property.
Clicking on the card extends the display up to thirty seconds - counting from the click. Each subsequent click extends again. The card that remained
more, the click does not shorten.
Right click opens two actions:
- Copy
-
buffers time, script code, component name, view
and text. Convenient when a notice needs to be attached to a request or just save it before it disappears.
- Hide All
-
removes the entire stack. Useful when the script
talkative.
|
Cards are not saved in the editor itself: cards that have disappeared cannot be returned here. If the notification is important, extend it by clicking and copying it - or setting
component Auto-hide, with = wait until you close it. And so that the notification remains after closing tabs, the component has the Save property (see below). |
How the script sends them
Notifications are sent by the Notification component (Notification Component).
|
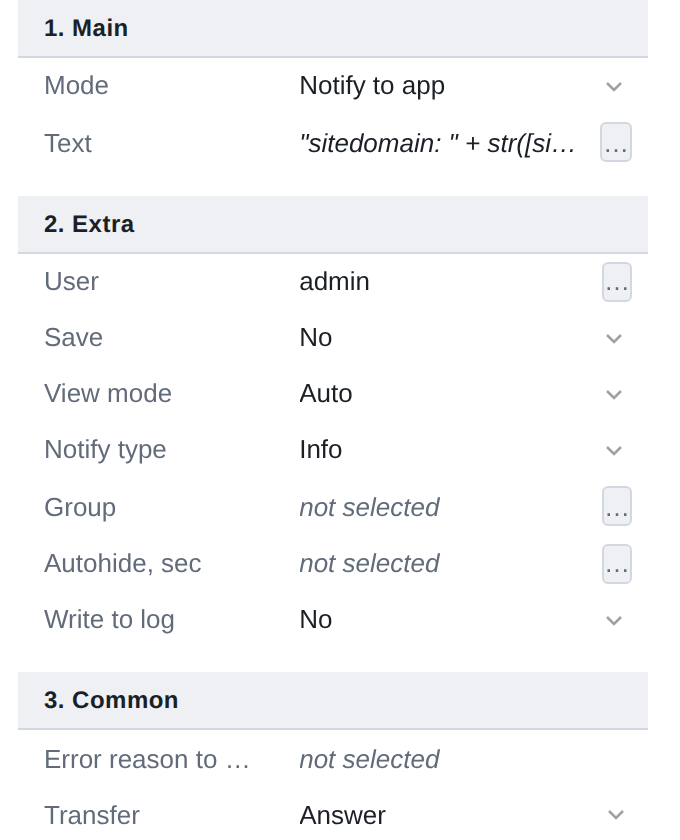
By default, this component writes to the log, and not to the application. To notification appears on your screen, in the Mode property you need to select sending to the application. It does not go “to all websockets in a row”, but to a separate service interface notifications. The script editor is listening to him - that’s why the cards are visible here; A specially written application can also listen. Regular applications platforms, including product packages, in standard mode on this interface are not connected and do not receive such notifications. |
Next, you configure what is visible on the card:
- User and Group
-
to whom to send. Notification will be sent to those who
indicated here - to the same service interface that listens to them
script editor The editor is open - the card will pop up; closed - The notification will still go away, there will be no one to show it to.
- Text
-
what to show. This is an argument, not a string: this applies equally
both a constant and an expression assembled from several variables and starting
parameters. The current time is also substituted - by an expression with suitable
functions (Chapter 15), convenient, when you need the moment of an event.
- Notification type
-
card color: info, success, warning, error.
- Auto-hide, s
-
how many seconds to keep. Empty - eight.
- Save
-
write the notification to the database - then it will remain in the account
user, and will not disappear along with the card. There is a possibility, but There’s no point in overdoing it: one-way asynchronous notification is cheap,
entry to the database - no. It is usually not needed for quick debugging.
Debug notifications
That’s why it’s worth mastering.
The editor does not see handlers and does not show variable values specific call - but he sees notifications. So the script can
tell about yourself, and you will read it without leaving the editor.
The reception is like this:
-
Place Notification at interesting points in the script in sending mode
  in the application, the addressee is yourself.
. In _Text_ write the expression: where we are and what is now in the variables.
For example, "after menu, dtmf=" + str([dtmf]) + ", try " + str([tries]).
-
Save. Call IVR or run a service script
(xref:scripts:scripteditor/start-service.adoc[Chapter 25]).
-
Look in the lower right corner of the editor.
Cards arrive as they are completed and strictly in the order in which
the script sent them - the sequence of events is preserved. According to them
you can see something that is not visible either on the map or in the trace: *which branch did you take?
real call and with what values*.
|
A few tricks that save time. Number. 1. entrance, 2. after the menu, 3. before transfer - by number You can immediately see which points the call passed and which it missed. Write values, not facts. “Passed” says less than “comparison: [a]=17, [b]=20 → false.” Bet different types. Erroneous branches - red type, normal move - informational. The stack is then read by color. Don’t forget to turn it off. Debug notifications are the same components scenario: before combat saving they are turned off (Chapter 21), rather than being removed. Challenge will pass through them, and turning it back on is just one click. |
What not to expect
Cards live in the tab: by default the pop-up notification is nowhere
doesn’t remain - the editor has been closed, and there is no one to show it to. Need a trace
for a long time - the component has the Save property (see above): with it
the notification is sent to the user’s account. For fluent debugging this is redundant. This is not a debugger: there is no step, breakpoint or variable viewing here.
The notification will say exactly what you asked it to say.
Addressee is required: the notification is sent to the specified users.
If the recipient is not you, nothing will appear in your editor.
The order is maintained: the sequence of events is guaranteed - cards come in the order in which the script sent them. You can read the stack
progress as is.